
De telefooncentrale is nu in de lucht, tijd om devices (sofphones, hardware VoIP phones and mobile phones) aan te sluiten en om te zorgen dat de gebruiker van de extensie ook toegang heeft tot voicemail. Zowel via de telefoon als via het UCP
Registreer extensie (telefoon) eerst in FreePBX & Asterisk
In FreePBX heten telefoons Extensions. Klik op [Applications] en daarna [Extensions] in het dropdown menu. Hierna selecteer je het tabblad SIP [chan_pjsip] Extensions en toets je op [+ Add New SIP [chan_pjsip] Extension]. Voer de instellingen van deze telefoon in, voorbeeld:
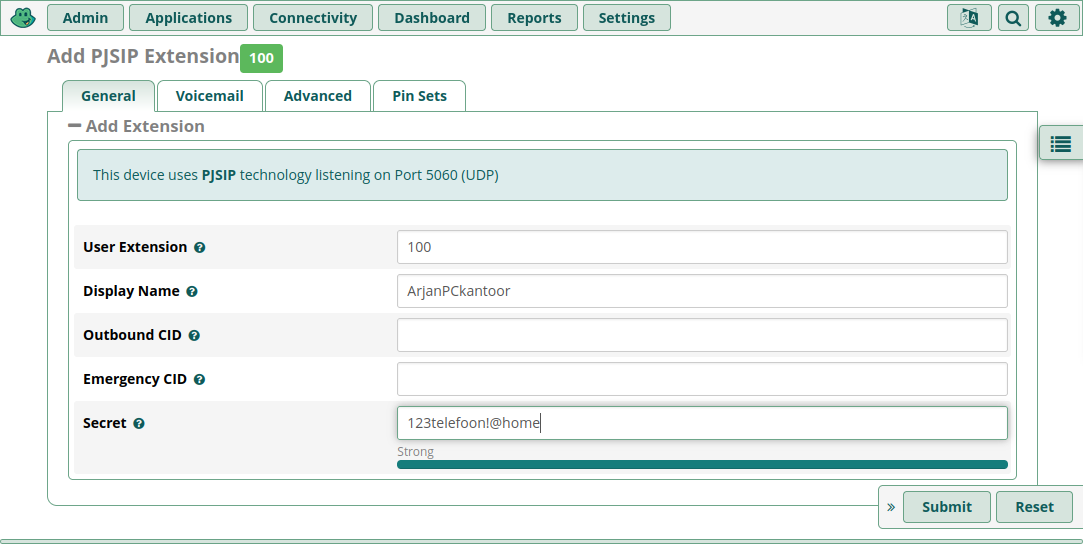
Next select the [Voicemail] tab. Set Enabled on “Yes” and set the Voicemail Password to the same number as the extension. This will force the user to setup their mailbox on first access. Also specify an email address if appropriate. If a voice mail comes in on this extension then an email to this email address is send to notify this person about the newly receivedvoicemail. Vervolgens toets je [Submit].
This is the process you have to follow to add a new extension. Repeat this for all your phones in your numberplan. Once you have added all your phones/extensions click on the red [Apply Config] button to make the configuration active.
FreePBX now knows everyting it needs to know about the extensions. It’s time that the extensions/phones know about the PBX!
Telefoons Configureren
Er zijn diverse soorten VoIP telefoons, we lopen ze even 1 voor 1 door.
Soft Phone
Er zijn heel veel softphones in open source. Ik heb voor dit artikel gekozen voor Linphone . Deze ondersteund Linux, Windows, Mac, iOS en Android. Download het van de website en installeer het op je systeem. Start Linphone op en toets op [USE A SIP ACCOUNT]. In het volgende scherm zet je je SIP Account op.
Neem dezelfde gegevens als die je gebruikt hebt bij het opzetten van de Extension. User name is de extensie die je hebt ingevoerd, Display name is de gebruiksvriendelijke naam die weergegeven moet worden, SIP domain is het lokale IP adres van je RasPBX systeem (or it’s hostname if you have a DNS who can resolve it). Het wachtwoord is het wachtwoord dat je hebt ingevoerd bij de configuratie van deze extensie. Zet het Transport op UDP. En toets nu [USE].
Repeat this process for all your softphone, except for softphones on your mobile or tablet. We’ll get there in a moment.
Terug naar het Dashboard. Kijk in de grafiek FreePBX Statistics, je zult zien dat er Users (read extenions) Offline zijn en a few Online (in this case Linphones you installed and configred). Time to put it to the test, use a Linphone to call another Linphone!
Hardware Phone
Een VoIP telefoon is al voor een paar tientjes op Marktplaats en daar kun je heel veel plezier van hebben. Ook als je PC uit staat kun je bellen. De hardware VoIP telefoons configureren in je telefooncentrale gaat op dezelfde wijze als bij een Soft Phone (zie hierboven). De Soft Phone op je PC moest je configureren, een Hardware telefoon ook. Het enige nadeel is dat dat bij elke telefoon weer anders is. Download altijd de user/admin manual van de telefoon. Dit kan je heel wat zoek werk schelen. Net als bij een softphone moet je deze telefoon ook vertellen wat het IP adres is van je telefooncentrale (dit heet bij de meeste VoIP telefoons de Proxy). Ook het extension nummer moet je ingeven (dit heet vaak User ID) en daar hoort natuurlijk ook het password bij (soms gebruiken ze het woord Secret). Vergeet ook niet te controleren of ze ingesteld staat op UDP.
Dit doe je via het webinterface van de telefoon. Hang je telefoon in je netwerk, zorg dat ze spanning verkrijgt via PoE (Power over Ethernet) of sluit een externe voeding aan (vaak 5V/1,5A, meestal niet meegeleverd, PoE is min of meer de standaard). Het webinterface is meestal bereikbaar via http://ip-van-telefoon. Mocht het bij jou telefoon toch net even wat anders zijn, lees dan de admin/user manual.
Mobiel
Tot nu toe spraken we over telefoons op je PC of je bureau. Maar wat nu met een mobiele telefoon. Kun je daar wat mee? Ja! Linphone is beschikbaar voor iPhone en Android.
De eerste stap is dat je in FreePBX een Extension aanmaakt. Dat gaat op dezelfde wijze als een Soft Phone of een hardware VoIP telefooon (zie hierboven). Vervolgens installeer je Linphone op je mobiel en open haar. Nadat je diverse toestemmingen hebt gegeven kom je bij de Assistant uit die je helpt Linephone te configureren. Toets op [USE SIP ACCOUNT]. Zet hier de Usernaam op de waarde van je extensie (b.v. 700). Password vul je met de waarde van Secret.
Nu domain; je mobiel hangt aan het 4/5G netwerk of aan een wifi netwerk (at home or abroad). Je mobiel is dus bijna altijd buiten je eigen wifi netwerk. To connect to your PBX your mobile has to make a connection with your RasPBX inside your own network. This can be done by making a connection with the IP address that your provider attached to your modem/router. In your modem/router you already forwarded the necssaary poorts to the RasPBX. Check in de box. Actually this will also work if you are connected to the same nwetwrok as where your RasPBX is in.
Therefore the domain wordt het IP adres van je modem/router. Display Name vul je met de waarde van de Display Name die je bij de extensie hebt gezet, en zet het transport op UDP. Toets vervolgens op [LOGIN]
Helaas, je zult nog niet “connected” zijn. Toets op het hamburger menu en selecteer [Instellingen]. Er is een [SIP Account <gebruikte extensie>], toets hierop. Zet Meer Opties op ON. Zorg dat het Wachtwoord correct is, tevens zie je, boven Wachtwoord, ook een Gebruikers-ID, zet deze op <gebruikte extensie>. Klik op het pijltje naar links om terug te gaan, en klik nogmaals op het pijltje om terug te gaan.
Toegang tot voicemail via een web interface (UCP)
You might have noticed that while your were adding an extension there was something related to a user. We didn’t took to much attention to it, you did setup a password for the user, enabled voicemail and set a password for voicemail. However this is for acessing voicemail via the Phone. You can also access voicemail via the web. This uses a different password!! Although you can make them the same, you still need to manage them seperatly. Here is how to set up access to voicemail via the webinterface (UCP)
Actually FreePBX created for each extension a user. Select [Admin] and then [User Management].
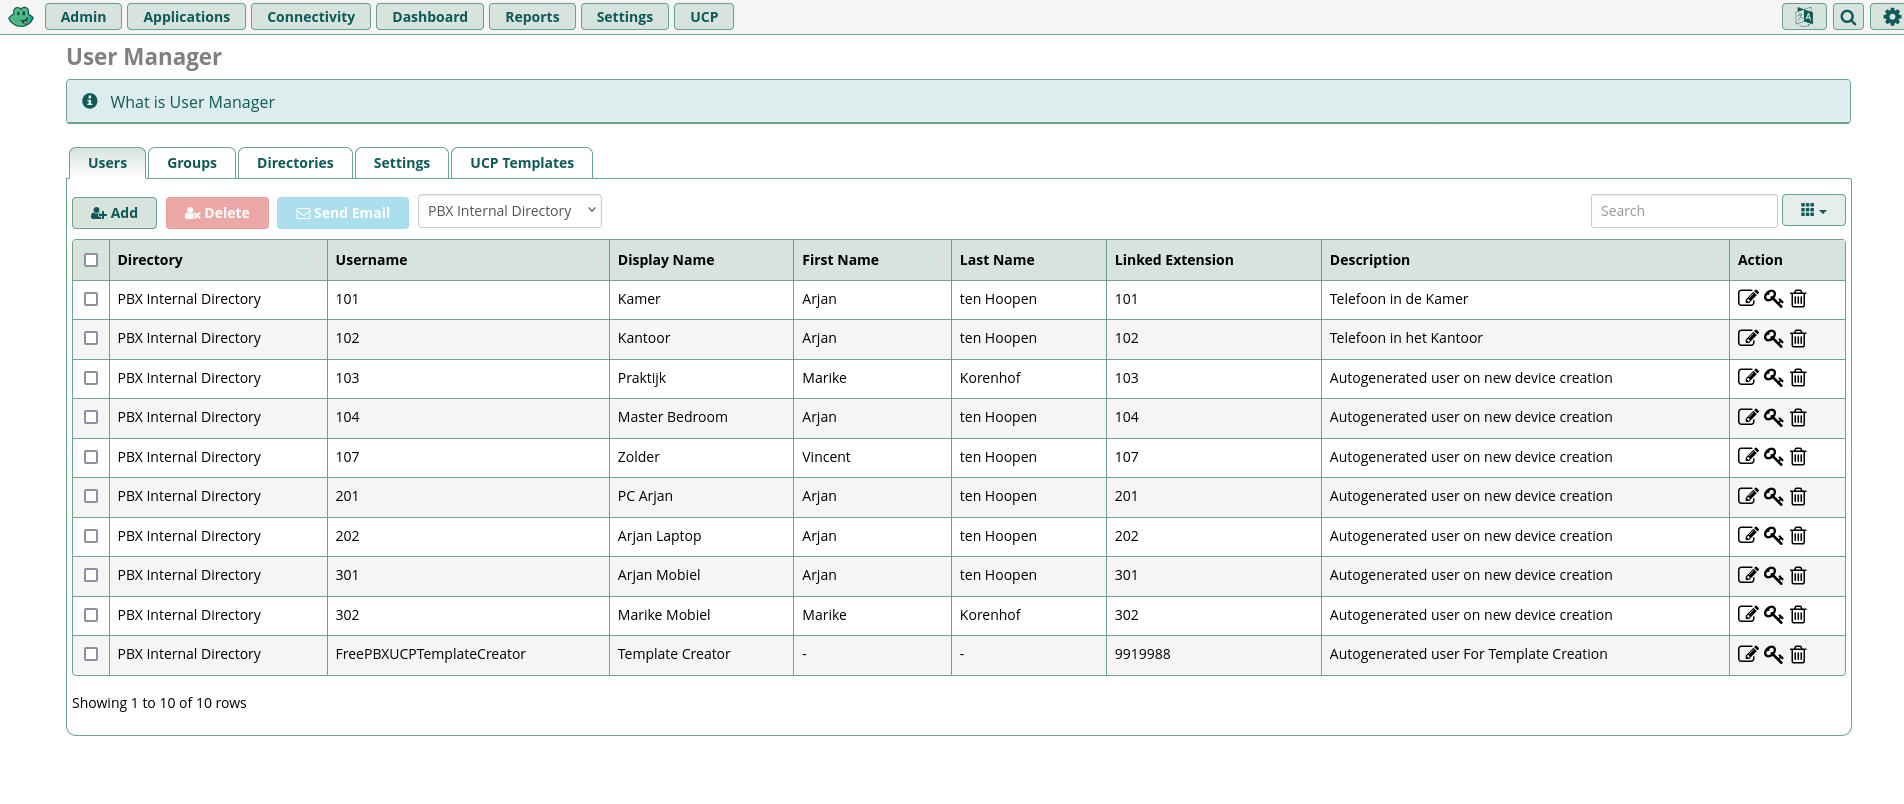 Here you see an overview of all the user who were created for you. Every extension will have a user. More precise the username is the extension number. Remember that in our setup a device is equal to a user. Therefore you will also see that the Username has a Linked Extension, which are the same.
If you want to change this to support an open floor plan, where each user will login to a phone, then goto [Settings], [Advanced Settings]. Under the heading System Setup you will find User & Device Mode. You can set this accordingly your needs. However, before you do that use your friend El Goog to get background information about this. Setting this is up us much more complicated than it seems.
I have an extension 102 and therefore also a Username 102. This extension is my phone in the office. Now if I get a call and I don’t pick it up it will be forwarded to voicemail. Please note that this is a little bit different from your normal (landline) phone with an answering machine build into it. There the answering machine, in the your phone, will pick up the call. Here the PBX takes control.
So if i got a voicemail, how do I know and how to get access to the voicemail to listen to them via the UCP interface.
First of all, if the extension has an associated email adres, then a mail is send to this email address. One of the ways to get access to the voicemails is by sending your browser to http://ip-of-raspbx/ucp
You need to login with the Username, which is equal to the extension number with a password which you have set when you created the extension ( Password in the User Manager Settings). Forgot this one, no problem. Goto [Admin] [User Management] . At the specifik user select the edit icon under Action. Now you can (re)set the password:
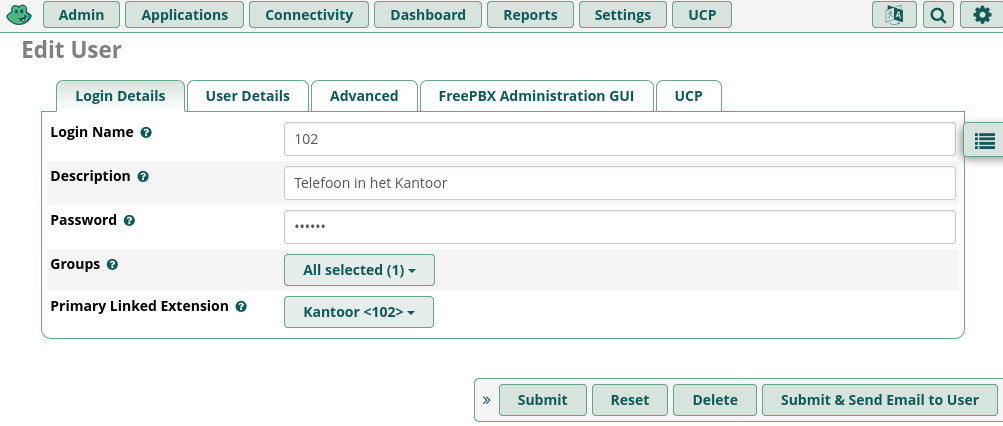
However the user must be allowed to login to UCP, this must be set. Goto Admin -> User Managent (if you are not already there)
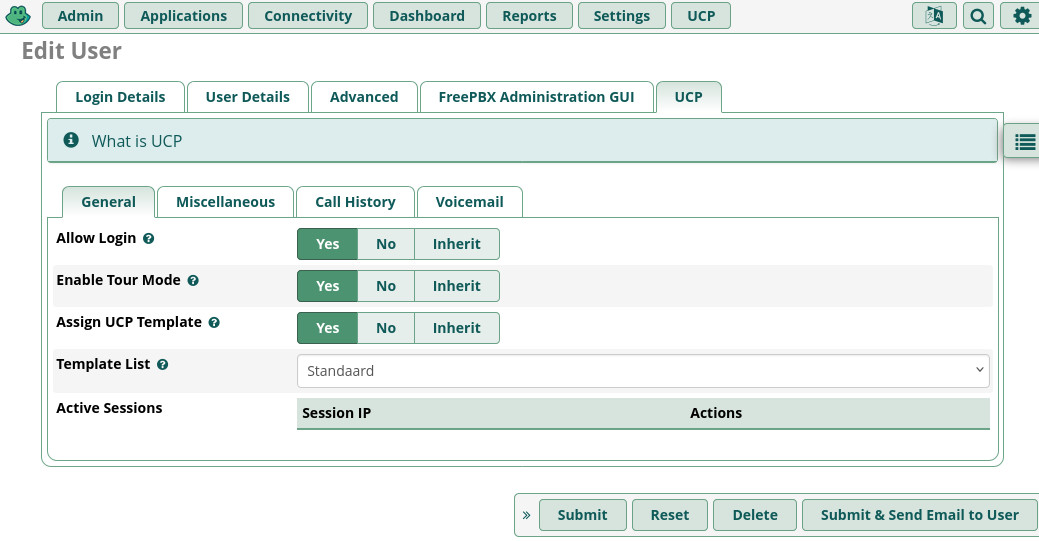
Selectt the user who must be enabled to use UCP and select the UCP tab and
- allow the user to login
- enable de tour
- assign UCP template (mag je overslaan)
Voorbeeld:
 Vervolgens klik je op het tab Voicemail en zet je de instellingen zoals hieronder. Let op, Allowed Voicemail moet de huidige extensie zijn!
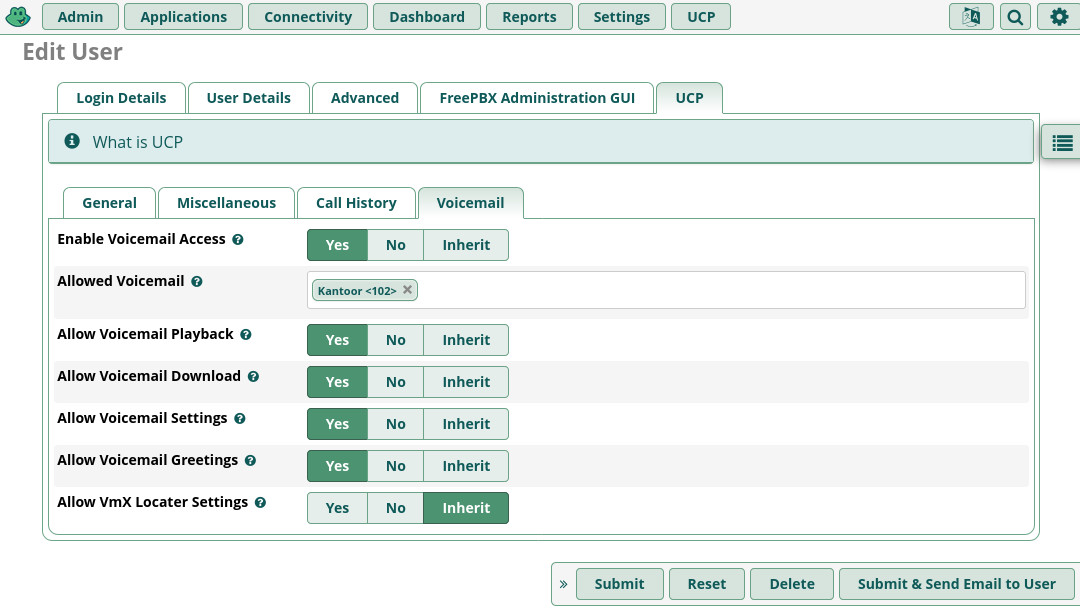 Mag duidelijk zijn dat je dit moet doen voor alle users!
Now login to the User Control Panel (UCP). You will be presented with a small tour, please follow the tour to get some basic understanding of the UCP. Click somewhere near the exclamation mark to create your dashboard.
- Give the new dashboard a name en you will be presented with an empty dashboard.
- On the left click on the + sign This will enable you to put widgets n the dashboard.
- Select Voicemail, then the approraite extension displayed by its display name.
Feel free to explore the widgets and add them to the dashboard.
Now make a call to this extension, don’t pick it up, and enter a voicemail.
Your not happy with the language in which the voicemail system speaks to you? Goto [Admin] [Sound Languges] and download the language of your choice. Next click on [Settings] and select the desired language, press [Submit] followed by the red [Apply Config]
En nu bellen maarrrrrrrrrrrrrr ……………….